
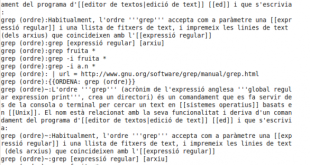
GREP, which stands for global regular expression print, is a sophisticated Linux/Unix tool that can serve many purposes, but one useful purpose on a dedicated server is its ability to search files and directories. With grep you can search within multiple files with relative ease. You can also parse printed screen data to simplify results.
To search a file, just enter “grep” followed by the search term and then the filename. For example, to search the file “httpd.conf” for the word “localhost”, you would type:
grep localhost httpd.conf
To use grep, to simplify printed screen lists, use the following format:
ls -al /usr/bin | grep make
This will list all of the files in the /usr/bin directory, but will only display those files that contain the word “make”. For more in-depth documentation, including use of regular expressions, type “man grep” from the command line.
Photo Source: Wikimedia Commons
Previously, I mentioned some of the benefits of using the “history” command to display any or all of your previous commands. On dedicated servers, whether Linux or Unix, that use “sudo” rather than “su” to become root, it can be aggravating when you type a long command string only to realize you forgot to type “sudo.”
One easy solution is to press the up arrow, move over to the beginning of the string, and add sudo. But there is an even easier way to replay the command with root permissions.
Right after you have entered the command missing sudo, just type the following:
sudo !!
This will automatically run the last command in the shell history with whatever you place before it (in this case “sudo”). It is quick, easy, and gets the job done. In fact, you can use “!!” any time you want to repeat the previous command. Log in to your server via SSH and give it a try.
Photo Source: Wikimedia Commons

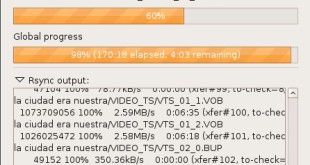
Question: How can I easily perform incremental backups on my dedicated server?
Answer: There are few tasks more important than backing up your server. Because of the nature of computers and especially the nature of the Internet, you are bound to have problems. They may or may not cause data loss, but that is not a chance you want to take.
Rsync is a tool that simply syncs the files in one directory with another. What makes it ideal for backups is that 1) it can archive files and compress them and 2) it can use SSH to perform the backups to remote servers.
To run an rsync backup, just execute the command like this:
rsync -avz ~/public_html username@hostname.com:/home/user/backupfiles/
This will backup, archive, and compress the files found in public_html on your server. Finally, it will send those archives to the remote server in the directory specified. The best part about rsync is that, the next time you perform a backup, it will only backup the files that have changed (i.e. incremental backups), saving you bandwidth and time.
In Linux, the most common method used to create new users is to use the “adduser” command. This is fine when you need to add one or even a few users, but if you need to add numerous (i.e. 50, 100, or even 500), typing in the adduser command repeatedly can be tedious.
You can simplify it to a degree by creating a flat data file that contains all of the user information and then uploading it all at once. This should shave some time off of the process and get your server ready for business a lot faster. To do this, you need to use the newusers command.
As root, enter the following:
newusers filename
The file should contain a user on each line in the following format:
loginname:password:uid:gid:comment:home_dir:shell
For example, a user named Serious Bob would look like this:
sbob:HcZ600a9:1008:1000:Serious Bob:/home/sbob:/bin/bash
Add more users on separate lines, and save the file as batch-users.txt.
Finally, run the command:
newusers batch-users.txt

On a Linux dedicated server, the normal method for deleting files is to use the “rm” command. This removes the file from the current filesystem, but what many do not know is that those removed files are usually recoverable. As such, rm is more like putting something in the trash or recycle bin on a desktop.
The only way to effectively delete a file is to overwrite the space the file was using. You can accomplish that with the “shred” command. Just like shredding important physical documents, shred makes sure your files are good and gone, so please use with caution. Once it is gone, it is gone.
On a web server, you may want to make sure you delete sensitive information completely (a database of credit card numbers, for example). To do so, run the following command:
shred filename
You can also shred it a number of times just to be sure:
shred -n 7 filename
This will shred “filename” seven times. For more information about shred, type “man shred” from the command line.
Photo Source: Flickr
Question: I just typed a really long complicated command line string on my server, but I forgot to type “sudo” at the beginning. Is there a quick way to enter it again?
Answer: The history feature in Linux and Unix-like operating systems is truly a beautiful thing. With it, you can easily re-enter commands. But what do you do if you need to re-enter a command but need to add “sudo” to the beginning? On Ubuntu, Mac OS X, and many other servers, “sudo” is the default method used to gain administrative rights, but it must be entered before each administrative command.
There are two ways to fix this. One is to simply press the up arrow. You will again see your command exactly as you typed it. To add sudo to the beginning, press the “Home” key, which should move the cursor to the front. Then, all you have to do is enter sudo, add a space, and press Enter.
An even quicker method is to use “sudo !!” to automatically reload the command with sudo. This will look to the last command entered in the “history” list and run it again. You can also use “!!” without sudo anytime you want to quickly run a command again.
Image Source: Wikimedia Commons
Sometimes when I am working on a project and come across a new powerful Linux command, I need to test it. With a live dedicated server, that can be a recipe for disaster. Rather than taking such a risk with your websites and possibly the websites of customers (if you also host sites), I recommend creating test accounts.
A test user will have a unique set of configuration settings, its own home folder, and its own username and password. The second dilemma I encountered, however, was that once the account was created, I did not want to always have to log out of SSH and then login as the other user. In fact, for security reasons, I did not want the test user to have SSH access all.
Normally, the “su” command is used to become root, but you can also use it to login as any other user, directly from your SSH command prompt. To execute the command, type:
su -- username
It will then ask you for the specified user’s password. Enter it, and you are ready to test.
Image Source: Oxygen icons

An important part of file management is the removing of files that are no longer needed. Files, by their very nature, take up space, and something that is not needed should not take up space on a server, where space is money. The “rm” Linux command handles basic removal of files, but here are some additional settings you can use with “rm” to handle various types of removal tasks.
rm -l With the “-l” flag added after “rm”, the command will prompt you only when removing more than three files. You can use this as a precaution to keep from accidentally removing large amounts of data.
rm –one-file-system This instructs “rm” to remove only files that match the current file system, which is useful when removing several directories at once.
rm -r Recursive removal means that the top-level directory and the files and directories inside it will be removed together.
rm -v This displays information about the removal, rather than just returning to an empty command prompt.
rm -f To force removal without any prompting or warnings, use the “-f” flag, but please use it carefully.

There are two ways to schedule a task on a Windows server: graphical (from the system tools menu) or from the command line.
Graphical
1. If you have direct access to the system tools menu, click the “start” button and then go to Programs > Accessories > System Tools > Scheduled Tasks.
2. Click “Add Scheduled Task” and click “Next”
3. Select the program you want to run
4. Give the task a name
5. Select the date and time options
6. Enter your password and then click “Finish”.
Command Line
Use the command schtasks. From the command line, enter a string like this:
schtasks /create /tn "Webapp Task" /tr "webapp-prog.exe" /sc hourly
This would schedule the job to execute every hour.
For more information about schtasks, see the Microsoft documentation
Photo Source: Flickr
Linux servers provide system administrators with a great deal of flexibility and information about the inner workings of the system. If you ever want to know about every minute detail of your hardware, Linux can do that. The same is also true of hardware.
For general files, the “stat” command is an excellent tool. If you are ever suspicious about a particular file listed on a website hosted by your server or just want to know technical details about it, “stat” can provide you with more information. To run stat, just enter the command followed by the file name:
stat whois-list
The output will look like this:
File: `whois-list'
Size: 6200 Blocks: 16 IO Block: 4096 regular file
Device: 803h/2051d Inode: 6138752 Links: 1
Access: (0644/-rw-r--r--) Uid: ( 1000/ user) Gid: ( 1000/ user)
Access: 2010-05-30 21:04:39.000000000 -0400
Modify: 2010-02-01 12:35:24.000000000 -0500
Change: 2010-02-01 12:35:24.000000000 -0500
This provides a host of information all at once. You can also use it to list metadata about multiple files. For more information about “stat”, type “man stat” from the command line.
Image Source: Wikimedia Commons
Continue reading: Using the Stat Command to Display Metadata

There are a few of ways to find files on a Linux server, but most of them involve actually searching through each file in the filesystem until the correct one is located. This can be time consuming and taxing on the server’s CPU load, especially if you have a lot of files.
Linux has two commands that make searching a little easier: locate and slocate. Unlike other find utilities, locate searches through a database that contains information about the filesystem, bringing up the search results almost instantaneously. The command to update the database is called “updatedb”, and many Linux distributions have the command run via cron every day.
The alternative version of locate, called slocate, is a security-enhanced version that only allows the user to find files he or she has the permission to access. While locate is a great tool for finding things on a server, it does have its issues. For one, you will only find files that were added or changed prior to the last updatedb execution. Furthermore, the very process of updating the database can be taxing on the server, even if it is only once a day. For the right situations, however, locate is a very useful Linux tool.
Photo Source: Flickr

In yesterday’s post, we learned how to find the discrepancies between two similar files using a command called diff. With it, we were able to compare them and identify the actual lines containing differences.
Once you have identified the differences between the two, you have a couple of options. If only one file is different, you can delete it, but if both files have slight differences and you need the changes from both, you will need to include the changes from both. That would normally involve creating a third file or revision containing both changes.
With the command sdiff you can display the file differences side-by-side and can also merge the two file changes into a third output file. To run sdiff, use the following command string:
sdiff -o outfile file1.txt file2.txt
It will display the two differences (see the image above). Press Enter, and it will then provide you with options. Choose the one you want and then Quit.